Visual input binding editor for Roblox's Input Action System. Configure keyboard, gamepad, and touch bindings in Studio.
How It Works
InputPro ships as two packages: a Studio plugin for visual editing, and an open-source runtime for your game code. Both are free.
1. Create in Studio
Use the visual editor to create contexts, actions, and bindings. Link your existing touch buttons to actions. Listen for keys in real time.
2. Export
One click exports your config as Roblox instances to StarterGui/InputPro/. A bootstrap script is auto-created.
3. Use in Code
The runtime reads your exported config and provides a simple API: BindPressed, SetContext, CreatePromptHint, and more.
Plugin Guide
The InputPro plugin adds a visual editor to Roblox Studio for creating input bindings without writing code.
Installation
- Install the plugin from the Creator Store (free)
- Open Studio — click the InputPro button in the toolbar
- The editor widget opens as a dockable panel
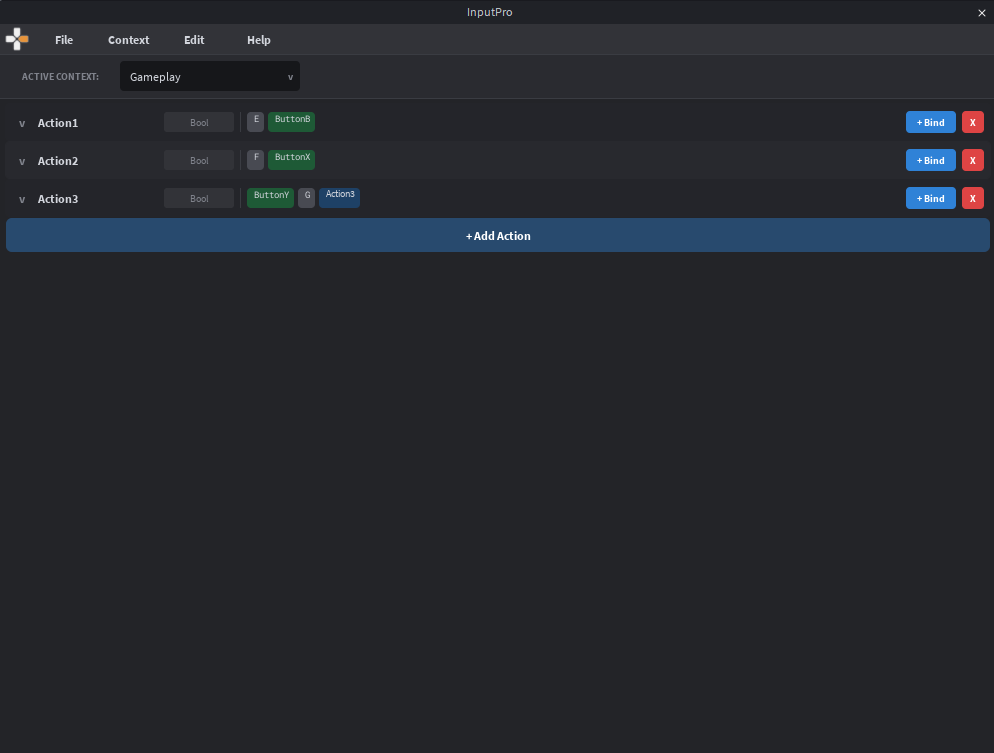
Quick Start
- The editor starts with a default "Gameplay" context
- Click "+ Action" to create your first action (e.g. "Jump", type Bool)
- Expand the action row, then click "+ Keyboard"
- The plugin enters listen mode — press a key (e.g. Space) and it's bound immediately
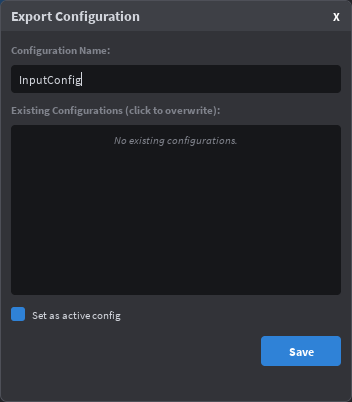
- Go to File > Export Config, name it, and click Save
- Press Play to test!
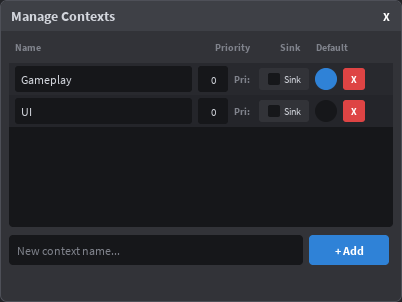
Contexts
Contexts group related actions and control when they're active. A game might have "Gameplay", "UI", and "Vehicle" contexts.
- Priority — Higher priority contexts process input first
- Sink — When enabled, blocks input from reaching lower-priority contexts
- Default — One context can be marked as default; it auto-enables when the game starts
Manage contexts via Context > Manage Contexts in the menu bar, or use the context dropdown in the top bar.
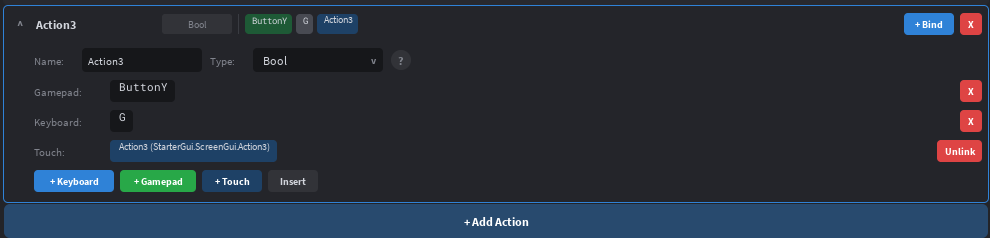
Bindings
Keyboard & Gamepad
Expand an action row and click "+ Keyboard" or "+ Gamepad" to add a binding. The plugin enters Listen Mode — press a key or button and it's bound immediately. You can also add bindings manually from a dropdown.
Touch
InputPro doesn't generate touch UI — you design your own buttons in StarterGui, then link them to actions in the plugin. This gives you full control over your mobile UI design.
How to link a touch button
- Create a TextButton or ImageButton in your ScreenGui (StarterGui)
- Select an action in the plugin, then click + Touch
- Select the button in the Explorer — the plugin validates it's a GuiButton
- The link appears as a touch pill on the action row, showing the button name and path
On export, each linked button is stored as attributes (TouchButtonPath, TouchButtonName) on the InputAction instance. At runtime, InputProService resolves the path in PlayerGui, creates an InputBinding with its UIButton property set to your button, and Roblox automatically wires tap events to the action's Pressed/Released signals.
Touch Gestures New in 1.3
You can also bind screen-level gestures directly to actions, with no GuiButton involved. Three gesture types are supported in 1.3:
- Tap — fires
Pressedonly on a single tap. NoReleased, noStateChanged— Tap is a one-shot pulse. - LongPress — fires
Pressedwhen Roblox detects a long press,Releasedwhen the finger lifts. Both events carry a position. - Swipe — fires
Pressedon touch-down, streamsStateChangedon every touch move, firesReleasedon touch-up. The payload includesStartPosition,EndPosition, andDurationso you can compute direction, length, or angle yourself — direction is never baked into the binding.
How to add a gesture
- Expand a Bool action row in the editor (gestures are Bool-only)
- Click the + Gesture button — an inline picker appears
- Choose Tap, LongPress, or Swipe
- For Swipe: edit the Tolerance field (default 10 px) — finger movement below this is discarded as a stray tap
Gesture bindings export as a Gestures folder under each InputAction, with one Configuration child per gesture. Older runtimes that don't know about gestures simply ignore them — forward-compatible.
nil as before. For gesture-driven events, it receives a GestureEventData table:
InputProService.BindReleased("Cut", function(payload)
    if payload then
        local delta = payload.EndPosition - payload.StartPosition
        local angle = math.atan2(delta.Y, delta.X)
        cutLineFrom(payload.StartPosition, payload.EndPosition, angle)
    end
end)Pressed (no Released). If you need press + release on touch, use LongPress. Sub-tolerance Swipe touches produce no events at all — a finger that briefly touches and lifts without crossing the tolerance is silently discarded.
Analog Triggers
R2/L2 gamepad triggers support custom pressed/released thresholds. Click the binding's edit button to configure when the trigger registers as pressed or released (0.0–1.0 range).
Export & Import
File > Export Config creates the full instance hierarchy in StarterGui/InputPro/<name> and:
- Auto-installs the runtime to
ReplicatedStorage/InputProRuntime/ - Creates a bootstrap
LocalScriptinStarterPlayerScripts/ - Optionally sets the exported config as active (so the bootstrap loads it)
File > Import Config reads an existing export back into the editor for modification.
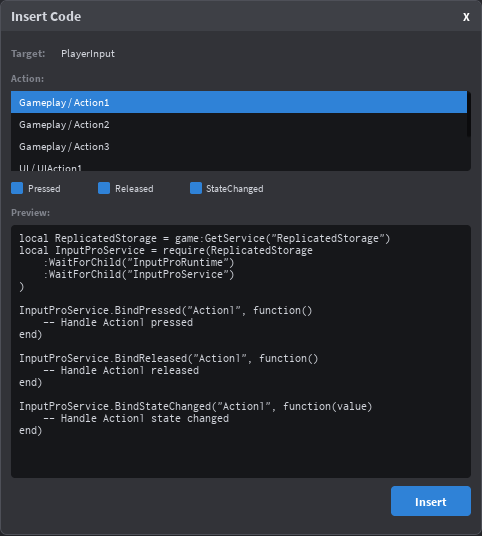
Code Generation
InputPro can generate boilerplate code for your actions and insert it directly into your scripts.
How to use
- Select a
LocalScriptin the Explorer - Go to Edit > Insert Code (or click the code icon on an action row)
- Choose an action from the dropdown
- Select which events to generate: Pressed, Released, StateChanged
- Preview the code, then click Insert
The generated code includes:
- The
requireblock for InputProService (auto-skipped if already present) BindPressed/BindReleasedcallbacks (Bool actions only)BindStateChangedcallback (all action types)
-- Example generated code for a "Jump" action:
local ReplicatedStorage = game:GetService("ReplicatedStorage")
local InputProService = require(ReplicatedStorage
    :WaitForChild("InputProRuntime")
    :WaitForChild("InputProService")
)

InputProService.BindPressed("Jump", function()
    -- Handle Jump pressed
end)

InputProService.BindReleased("Jump", function()
    -- Handle Jump released
end)StateChanged is available — Pressed and Released are automatically disabled in the UI.
Troubleshooting
| Problem | Solution |
|---|---|
| F key won't bind in listen mode | Studio intercepts F when Explorer has a selection. The plugin auto-clears selection on focus, but if it still happens, click inside the plugin widget first. |
| Gamepad not detected | Connect your gamepad before opening Studio. Ensure the viewport is in focus when using listen mode for gamepad — the plugin shows a reminder when you click "+ Gamepad". |
| Export not appearing | Check StarterGui/InputPro/ in the Explorer. Make sure you haven't filtered instance types. |
| Bootstrap not running | Verify StarterPlayerScripts/InputProBootstrap exists and its ConfigName attribute matches your export name. |
Runtime API Free
InputProService is a client-side module that reads exported configs and provides a clean API for input handling.
Installation
If you're using the plugin, the runtime is auto-installed on export. For manual installation:
- Download
InputProService.luaufrom the GitHub repository - Place it in
ReplicatedStorage/InputProRuntime/InputProService - Require it from a
LocalScript
-- In a LocalScript (e.g. StarterPlayerScripts)
local InputProService = require(
    game:GetService("ReplicatedStorage")
    :WaitForChild("InputProRuntime")
    :WaitForChild("InputProService")
)

-- Initialize from an exported config
InputProService.Init("MyGameInput")

-- Or initialize for manual/code-only setup
InputProService.InitManual()
Initialization
PlayerGui/InputPro/<configName>. Caches all contexts and actions, wires touch bindings, and auto-enables the default context if one was set in the plugin. Must be called once before other API calls (or they yield until ready).Actions
"Jump") and qualified names ("Gameplay/Jump"). Returns nil if not found.nil. For touch-gesture bindings (Tap, LongPress, Swipe) the callback receives a GestureEventData table — see Touch Gestures in the Plugin Guide. Returns a Connection with a :Disconnect() method. Yields until Init completes.nil; LongPress and Swipe deliver a GestureEventData table with StartPosition, EndPosition, and Duration. Tap is intentionally pressed-only and never fires Released.boolean for Bool, number for Direction1D, Vector2 for Direction2D, Vector3 for Direction3D. For Swipe gestures, fires on every TouchMoved after the tolerance gate is crossed, with a GestureEventData table whose Position is the current finger position. Tap never fires StateChanged.-- Bool action: Jump
InputProService.BindPressed("Jump", function()
character:FindFirstChildWhichIsA("Humanoid"):ChangeState(Enum.HumanoidStateType.Jumping)
end)
-- Direction2D action: Move (returns Vector2)
InputProService.BindStateChanged("Move", function(value)
-- value is a Vector2 with X and Y components (-1 to 1)
moveDirection = Vector3.new(value.X, 0, value.Y)
end)Contexts
exclusive is true, disables all other contexts first. Fires ContextChanged.- exclusive = true
- Only this context is active (e.g. switching to a menu)
- exclusive = false
- Additive — enable alongside existing contexts (e.g. adding a vehicle overlay)
ContextChanged.:Connect(callback).-- Exclusive switch: only Gameplay is active
InputProService.SetContext("Gameplay", true)
-- Additive: enable UI alongside Gameplay
InputProService.SetContext("UI", false)
-- Disable a specific context
InputProService.DisableContext("UI")
-- Listen for context changes
InputProService.ContextChanged:Connect(function(name, enabled)
print(name, enabled and "ON" or "OFF")
end)Device Detection
Input Images
- Gamepad: returns
(assetId, keyCodeName)— use the asset for button glyphs - Keyboard: returns
(nil, displayName)— e.g. "E", "Space", "LShift" - Touch: returns
(nil, nil)
Prompt Hints
- parent: GuiObject
- The UI element to attach the badge to
- config.Corner: string?
"TopLeft","TopRight"(default),"BottomLeft","BottomRight","Center"- config.Size: number?
- Badge size in pixels (default 32)
- config.Offset: Vector2?
- Position offset from the corner
-- Add a key hint badge to an inventory slot
local hint = InputProService.CreatePromptHint("OpenInventory", inventoryButton, {
    Corner = "BottomRight",
    Size = 28,
    Offset = Vector2.new(4, 4),
})

-- hint.Frame   — the UI frame instance
-- hint.Update() — force refresh
-- hint.Destroy() — cleanupPromptHintTemplate Frame exists in your exported config folder, it will be cloned instead of the default badge. The template must contain children named GlyphImage (ImageLabel) and KeyText (TextLabel).
Manual Setup No Plugin
You can use InputProService without the plugin by creating contexts, actions, and bindings in code.
Manual Creation API
sink is true, input doesn't pass to lower-priority contexts.Enum.InputActionType.Bool, Direction1D, Direction2D, Direction3D, ViewportPosition.KeyCode for keyboard/gamepad buttons. The optional config table accepts PressedThreshold and ReleasedThreshold for analog triggers (R2/L2 auto-default to 0.1).Complete Example
-- ManualSetup.client.luau (place in StarterPlayerScripts)
local ReplicatedStorage = game:GetService("ReplicatedStorage")
local InputProService = require(
    ReplicatedStorage:WaitForChild("InputProRuntime"):WaitForChild("InputProService")
)

-- Initialize without a config file
InputProService.InitManual()

-- Create contexts
InputProService.CreateContext("Gameplay", 1, false)
InputProService.CreateContext("UI", 2, true) -- higher priority, sinks input

-- Create actions
InputProService.CreateAction("Gameplay", "Jump", Enum.InputActionType.Bool)
InputProService.CreateAction("Gameplay", "Sprint", Enum.InputActionType.Bool)
InputProService.CreateAction("Gameplay", "Move", Enum.InputActionType.Direction2D)
InputProService.CreateAction("UI", "CloseMenu", Enum.InputActionType.Bool)

-- Bind keys
InputProService.CreateBinding("Jump", Enum.KeyCode.Space)
InputProService.CreateBinding("Jump", Enum.KeyCode.ButtonA)          -- Gamepad A
InputProService.CreateBinding("Sprint", Enum.KeyCode.LeftShift)
InputProService.CreateBinding("Sprint", Enum.KeyCode.ButtonL2, nil, {
    PressedThreshold = 0.3,
    ReleasedThreshold = 0.2,
})
InputProService.CreateBinding("Move", Enum.KeyCode.W)                -- Forward
InputProService.CreateBinding("Move", Enum.KeyCode.S)                -- Backward
InputProService.CreateBinding("Move", Enum.KeyCode.A)                -- Left
InputProService.CreateBinding("Move", Enum.KeyCode.D)                -- Right
InputProService.CreateBinding("Move", Enum.KeyCode.Thumbstick1)      -- Gamepad stick
InputProService.CreateBinding("CloseMenu", Enum.KeyCode.Escape)
InputProService.CreateBinding("CloseMenu", Enum.KeyCode.ButtonB)

-- Enable the default context
InputProService.SetContext("Gameplay", true)

-- Connect events
InputProService.BindPressed("Jump", function()
    print("Jump!")
end)

InputProService.BindPressed("Sprint", function()
    print("Sprint started")
end)

InputProService.BindReleased("Sprint", function()
    print("Sprint ended")
end)

InputProService.BindStateChanged("Move", function(value)
    print("Move direction:", value)
end)

-- Context switching example
InputProService.BindPressed("CloseMenu", function()
    InputProService.SetContext("Gameplay", true) -- exclusive: back to gameplay
end)

-- Device detection
InputProService.ActiveDeviceChanged:Connect(function(device)
    print("Switched to:", device) -- "Keyboard", "Gamepad", or "Touch"
end)
Action Types
Action types determine what kind of value an InputAction produces. Choose the type that matches your gameplay need.
| Type | Value | Use Case | Events |
|---|---|---|---|
Bool |
boolean |
Jump, shoot, sprint, interact — any on/off action | Pressed, Released, StateChanged |
Direction1D |
number |
Throttle, zoom level, single-axis analog input | StateChanged |
Direction2D |
Vector2 |
Character movement, camera rotation, 2D stick input | StateChanged |
Direction3D |
Vector3 |
Flight controls, 6DOF movement (up/down + left/right + forward/back) | StateChanged |
ViewportPosition |
Vector2 |
Mouse cursor position, touch point, screen-space raycasting | StateChanged |
Pressed and Released events. For all other types, use BindStateChanged to receive continuous value updates.